Interior Home Remodel: Room-by-Room Prioritization Guide for Omaha Homes
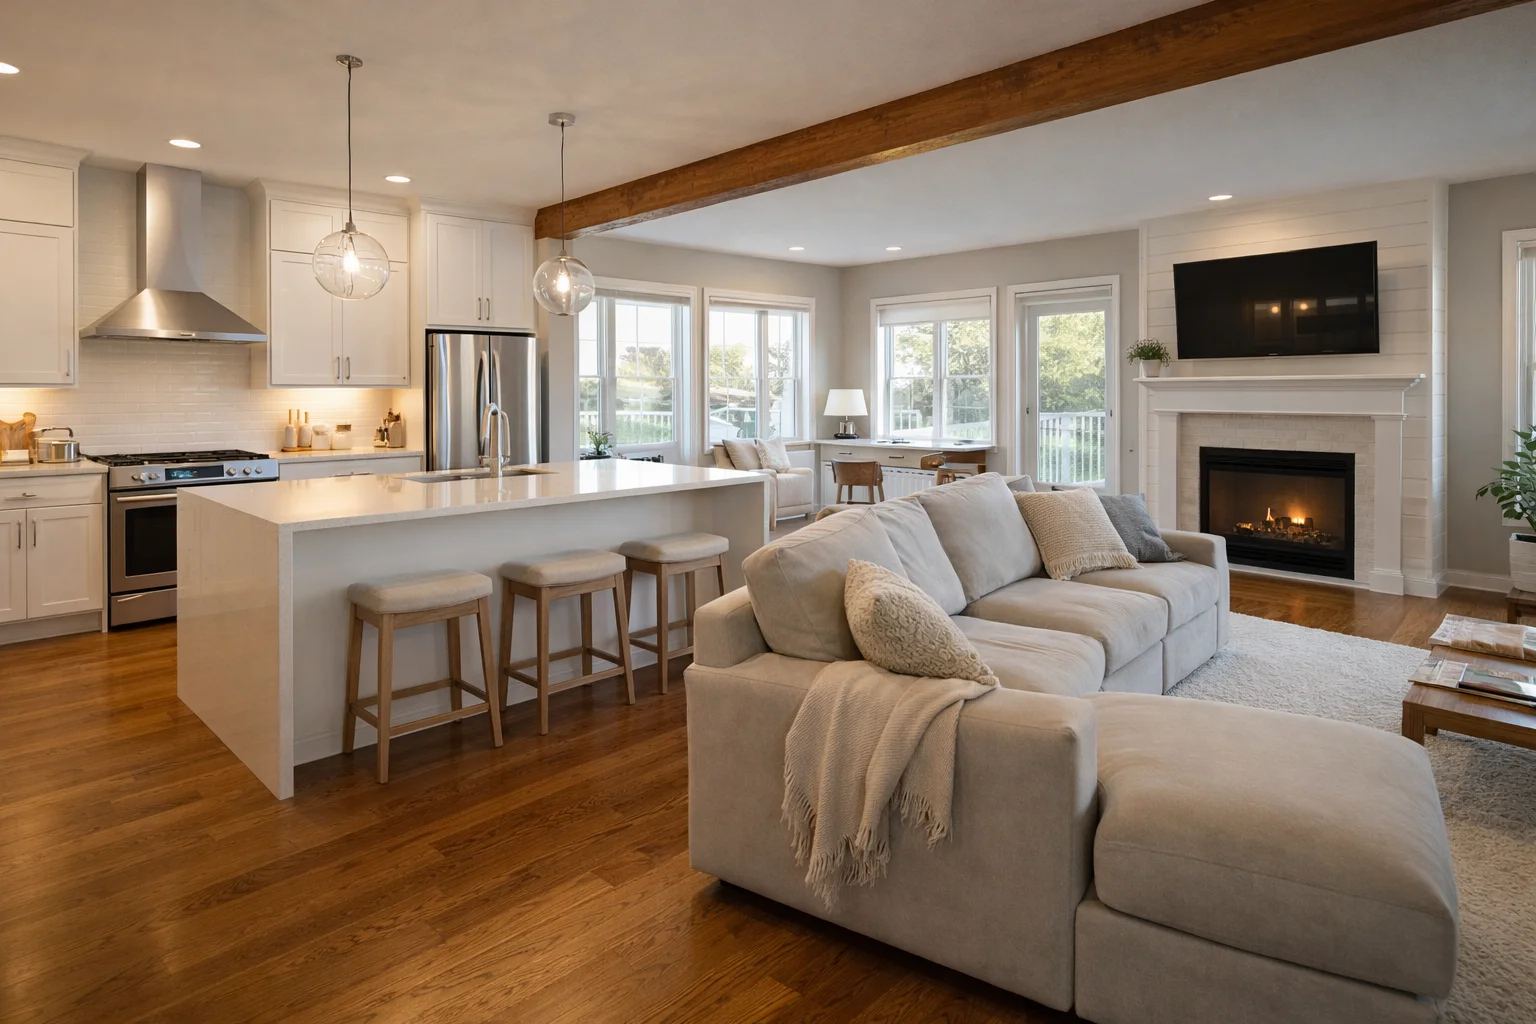
A strategic room-by-room approach keeps your interior remodel on budget and on schedule. Photo: LongView Renovation.
You want to renovate everything. The kitchen cabinets are stuck in 1997, the primary bathroom feels cramped, the basement is an unfinished cavern of lost potential, and the living room carpet has survived three dogs and two toddlers. The impulse is to rip it all out and start fresh. But unless your budget is limitless and you have somewhere else to live for six months, the smarter move is to renovate room by room in a deliberate sequence.
The order in which you remodel rooms is not a cosmetic decision. It directly affects how much you spend, how much disruption your family absorbs, and how polished the final result looks. Dust migrates. Plumbing lines connect. Flooring transitions matter. Get the sequence wrong, and you end up redoing work you already paid for. Get it right, and each phase builds on the last, saving money and delivering better results at every stage.
This guide provides a data-driven framework for Omaha homeowners to decide which rooms to tackle first, how to sequence multi-room projects, and how to live through the process without losing your mind.
What You'll Learn:
- • Which rooms deliver the highest ROI and livability impact for Omaha homes
- • The strategic 5-phase remodel sequence that minimizes rework and disruption
- • How to live through a multi-room renovation without setting up camp in a hotel
- • Cost ranges and realistic timelines for 6-month and 12-month renovation plans
Why Remodel Order Matters
Most homeowners choose which room to remodel based on which one bothers them the most. That is an emotional decision, not a strategic one. Here is why the order of operations matters from a construction standpoint:
Dust and Debris Flow Downhill
Demolition on an upper floor sends dust through HVAC ducts, down stairwells, and into every room below. If you renovate a main-floor kitchen first and then gut a second-floor bathroom, drywall dust will settle on your brand-new countertops. The rule is simple: work from the top of the house down. Second floor first, main floor second, basement last.
Plumbing and Electrical Rough-In Should Be Consolidated
Every time you bring a plumber or electrician to the job site, you pay a mobilization cost. If your kitchen and two bathrooms all need new supply lines or upgraded circuits, it is far cheaper to rough in all three at once than to bring the same subcontractor back three separate times over the course of a year. Consolidating rough-in work can reduce mobilization and coordination costs, often resulting in measurable savings on plumbing and electrical alone.
Flooring Goes In Last
New hardwood or luxury vinyl plank should be the final installation in any room. Foot traffic from contractors, dropped tools, paint drips, and heavy appliance installs will damage flooring that goes down too early. If you are running continuous flooring through multiple rooms, all the wall work, painting, and cabinet installation in those rooms needs to be finished before the flooring crew arrives.
HVAC Modifications Affect Adjacent Rooms
Removing a wall, adding a room, or converting a basement changes the heating and cooling load on your system. If your HVAC needs ductwork modifications, those changes can affect airflow in rooms you have already finished. Plan HVAC work early in the project so the system is balanced before you install finishes.
Remodeling ROI: What the Data Actually Shows
The most widely cited source for renovation return on investment is the Remodeling 2025 Cost vs. Value Report published by Remodeling Magazine (Zonda Media). The report tracks ROI by project type across nine U.S. regions, including the Midwest. It does not publish room-level ROI, so the room-based estimates below combine published CVV project data with regional contractor experience and Midwest resale trends.
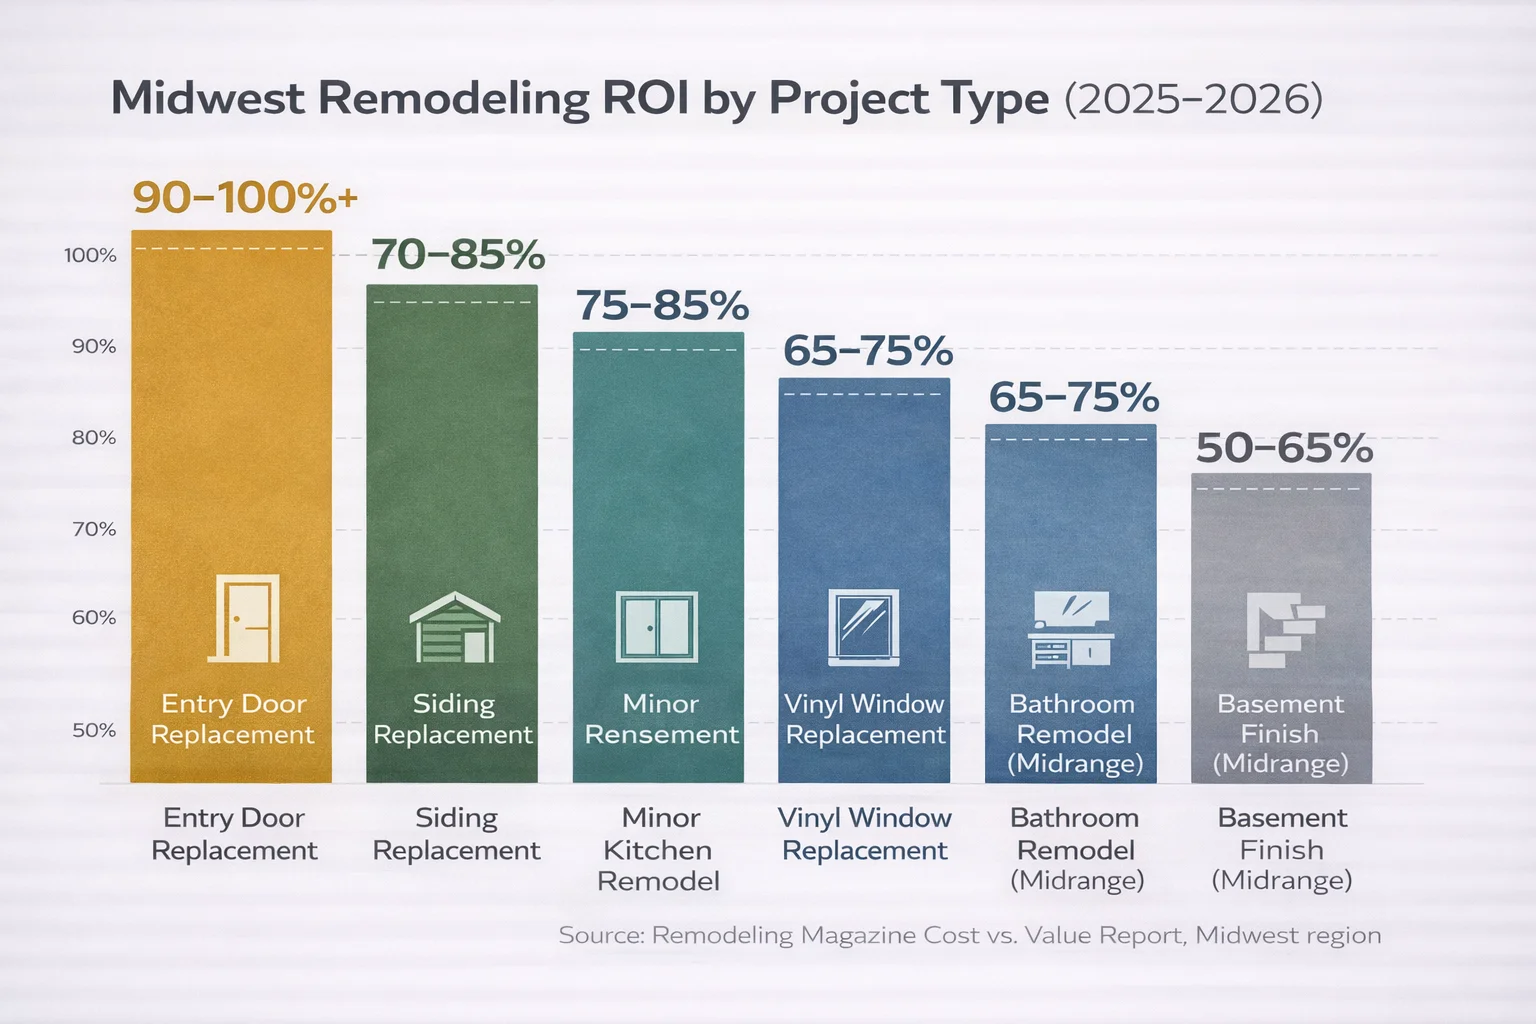
Midwest remodeling ROI by project type. Source: Remodeling 2025 Cost vs. Value Report (Zonda Media). Percentages reflect regional averages and vary by scope and market conditions.
Published Cost vs. Value Categories
These project types are tracked in the CVV report. National averages are cited where available; Midwest region recoup typically trends lower and varies by metro area:
1. Minor Kitchen Remodel
Among the Highest-Return Interior Projects
A minor kitchen remodel — cabinet refacing or mid-grade replacement, updated countertops, new appliances, lighting, and flooring — is one of the highest-ranking interior projects in the CVV report nationally. The 2025 national average shows 112.9% cost recouped; Midwest recoup values typically trend lower than the national average and vary by metro area. Typical Omaha cost: $25K-$55K depending on scope.
CVV project type: Minor Kitchen Remodel (ranked #5 nationally, 112.9% national avg.). Midwest region results vary.
2. Bathroom Remodel (Midrange)
60-75% Cost Recouped (Varies by Region)
A midrange bathroom renovation — new vanity, fixtures, tile, and tub or shower replacement — performs strongly due to buyer expectations around condition and function. National and regional recoup typically ranges between 60-75%, depending on scope and market. Primary bathrooms trend toward the higher end. Typical Omaha cost: $10K-$30K.
CVV project type: Midrange Bathroom Remodel, Universal Design Bathroom
3. Steel Entry Door Replacement
Highest Per-Dollar Return Nationally
A steel entry door replacement ranks #2 nationally in the 2025 CVV report with a national average recoup of 216.4%. Midwest recoup varies by metro area. As a low-cost project (typically $2,000-$3,000 installed), it delivers outsized value per dollar spent. Note: this is a single-item exterior project, not a full foyer remodel.
CVV project type: Steel Door Replacement (ranked #2 nationally, 216.4% national avg.). Midwest region results vary.
4. Basement Finish (Midrange)
Varies by Market
Basement remodels are recently tracked in the CVV report and show "most consistent" results nationwide according to Zonda. In Omaha, where basements are standard, a finished lower level ($30K-$60K) adds a family room, guest suite, or home office. Cost recouped varies by quality and whether a bathroom is included.
CVV project type: Midrange Basement Remodel (recently tracked in CVV)
Market Observations (Not Directly Published in CVV)
The CVV report does not track these as standalone project categories. These estimates are based on Midwest resale trends and regional contractor experience:
5. Entry / Foyer Renovation
Est. 50-70% Cost Recouped
New flooring, a coat closet upgrade, better lighting, and fresh paint in the entryway cost relatively little ($3K-$8K) but immediately signal that the home is well-maintained. This is among the highest ROI-per-dollar investments based on contractor and realtor observations.
Market estimate — not a published CVV category
6. Living Room
Varies by Scope
Living room renovations range from a $2K paint-and-flooring refresh to a $25K open-concept conversion. Cosmetic updates (paint, flooring, lighting) can recover 60-70%. Structural changes like wall removal often recover less than 50% due to higher cost, though they transform daily livability.
Market estimate — not a published CVV category
7. Bedrooms
Est. under 50% ROI
Bedroom renovations rarely recover more than 50% at resale because buyers expect bedrooms to be functional as-is. However, a new closet system, fresh paint, and updated lighting ($2K-$8K per room) make an outsized difference in daily comfort. Prioritize bedrooms for livability, not resale value.
Market estimate — not a published CVV category
The Strategic Remodel Sequence
Based on construction logic, ROI data, and the practical realities of living in a house during renovation, here is the recommended five-phase sequence for a multi-room interior remodel:
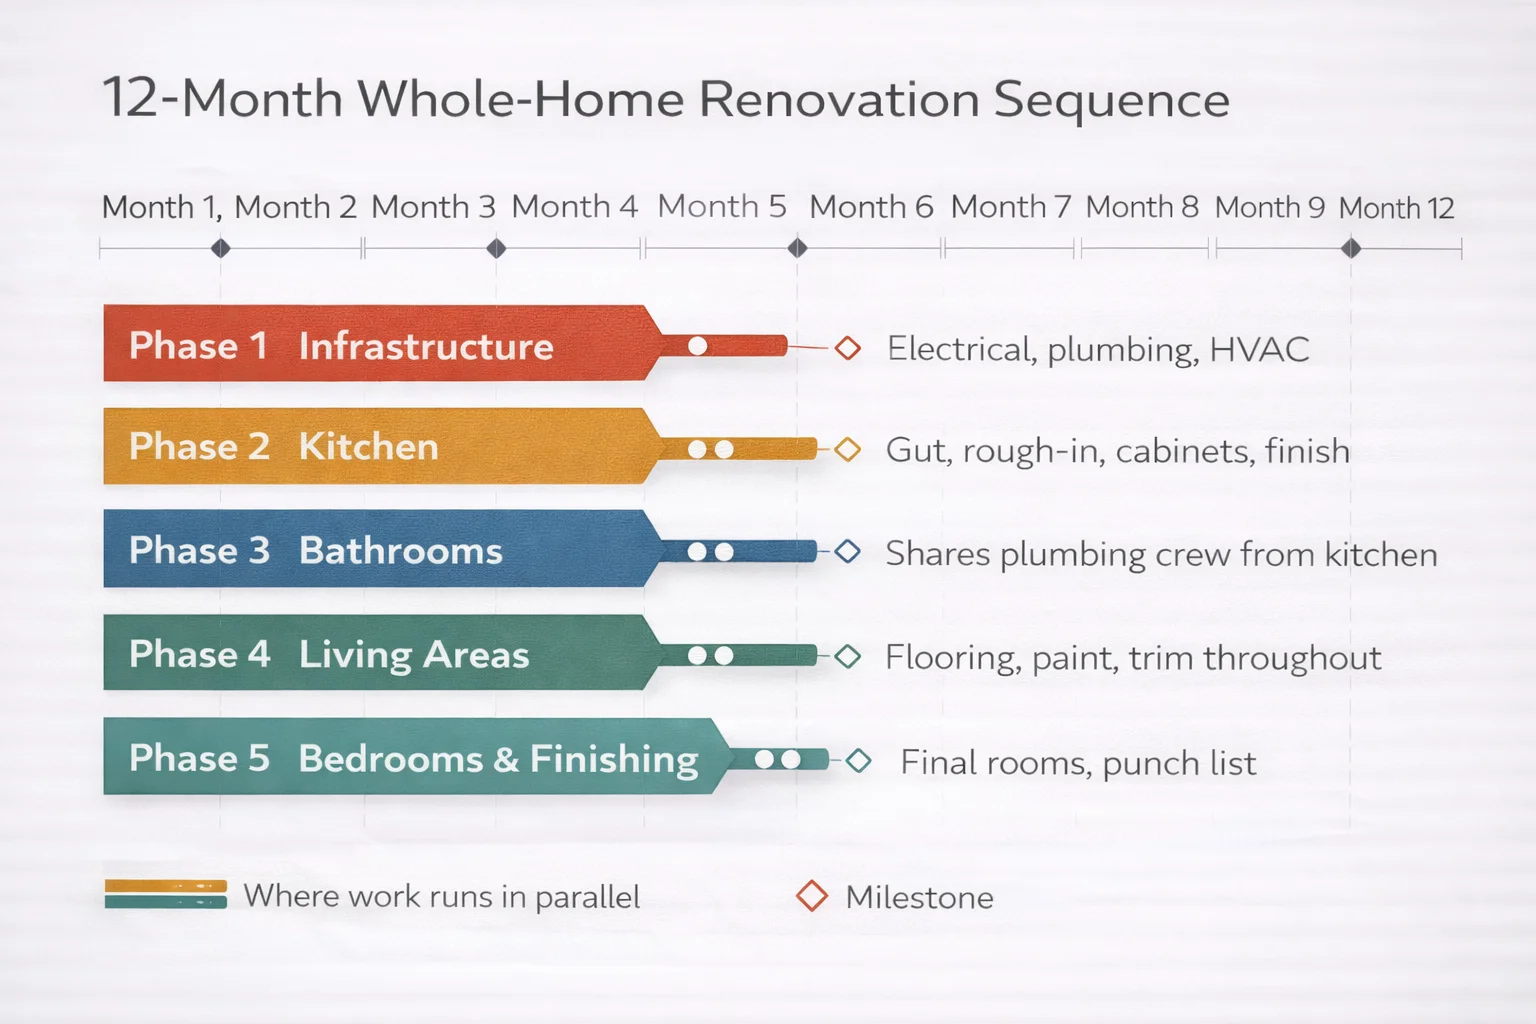
The optimal five-phase interior remodel sequence minimizes rework and construction disruption.
Phase 1: Infrastructure
Before you choose cabinet colors or tile patterns, address the systems that run behind the walls. If your electrical panel is maxed out, your plumbing is galvanized steel, or your HVAC is undersized, fix it now. Electrical panel upgrades ($2K-$4K), plumbing re-pipes ($4K-$8K for a typical Omaha home), and HVAC modifications set the foundation for everything that follows. Skipping this phase means opening finished walls later, which is expensive and demoralizing.
Phase 2: Kitchen
The kitchen is the biggest disruption to daily life, which is exactly why you should tackle it first. Ripping out cabinets, rerouting plumbing, and installing new appliances turns the most-used room in the house into a construction zone. Get it done early so you can reclaim your kitchen while the rest of the project continues. Kitchen renovations in Omaha typically take 6-10 weeks from demolition to completion.
Phase 3: Bathrooms
Schedule bathroom renovations immediately after the kitchen for two reasons. First, your plumbing subcontractor is already on site and familiar with the house's pipe layout. Second, bathroom work is contained to small spaces, so disruption is manageable if you plan bathroom access carefully. Doing the primary bathroom and a secondary bathroom back-to-back saves mobilization costs and compresses the timeline by 2-3 weeks.
Phase 4: Living Areas
With the kitchen and bathrooms complete, move to the living room, dining room, and hallways. This is where continuous flooring, paint, and trim work flow through the house. By doing these spaces after the heavy plumbing and electrical work is done, you avoid damaging new finishes. A whole-house flooring installation ($8K-$15K for mid-grade luxury vinyl plank) looks best when it runs uninterrupted from room to room.
Phase 5: Bedrooms and Finishing Touches
Bedrooms come last because they are the easiest rooms to seal off during construction and the least complex to renovate. New paint, lighting, closet systems, and flooring in each bedroom wrap up the project with the least disruption. This is also when you handle punch-list items from earlier phases: touch-up paint, caulk lines, hardware adjustments, and final cleaning.
Living Through a Renovation: Practical Tips
Most Omaha families stay in their homes during interior renovations. That is entirely doable if you prepare for the realities of sharing your house with a construction crew.
- Set up a temporary kitchen: Before demolition starts, stage a microwave, mini-fridge, electric kettle, and paper plates in a spare room or garage. You will use this setup for 6-10 weeks during a kitchen remodel. A folding table and good lighting make it bearable.
- Protect finished rooms with plastic sheeting: Zip walls and plastic sheeting over doorways between the construction zone and living spaces. Tape the edges. This single step prevents 90% of dust migration and keeps your sanity intact.
- Plan bathroom access routes: If you are renovating the primary bathroom, make sure the guest bathroom is fully functional before work begins. If both bathrooms are being done sequentially, confirm with your contractor that at least one is usable at all times.
- Communicate with your contractor daily: A five-minute morning check-in about the day's plan prevents surprises. Ask what is happening, what access they need, and when the loudest work will occur. Good contractors welcome this communication.
- Build a contingency buffer into your timeline: Material delays, inspection scheduling, and unforeseen conditions (old wiring, hidden water damage, structural surprises) mean many projects extend beyond original estimates. Building extra time into your mental timeline keeps expectations realistic and stress manageable.
The Domino Effect: How One Room Reveals the Next
Every experienced contractor knows this pattern: you start renovating one room, and it exposes issues that pull you into adjacent spaces. Understanding these domino effects before they happen helps you budget accurately and avoid scope creep.
- Opening walls reveals old wiring: When you remove kitchen cabinets or open a wall for a pass-through, you often discover knob-and-tube wiring, ungrounded outlets, or junction boxes buried behind drywall. These must be addressed before the wall closes back up. Budget $1,500-$3,000 for unexpected electrical work in any gut renovation.
- New kitchen flooring creates height transitions: If your new kitchen floor is a different thickness than the old one, you need transition strips or height adjustments at every doorway. This is why whole-house flooring in Phase 4 makes sense. It eliminates transition problems entirely.
- Paint color changes cascade room to room: You paint the kitchen a modern warm white, and suddenly the adjacent dining room's beige walls look yellow and dated. Color transitions between rooms need to be planned as a whole-house palette, not room by room. Doing living area paint in a single phase ensures visual continuity.
- Lighting upgrades make other rooms look dated: Install recessed lighting and under-cabinet LEDs in the kitchen, and your living room's single ceiling fixture feels like a cave. Lighting is one of the most contagious upgrades. Plan lighting improvements across multiple rooms in the same phase to avoid this contrast effect.
Open Floor Plan Conversions in Omaha Homes

An open-concept conversion transforms a segmented main floor into a single, expansive living space.
Removing a wall between the kitchen and living room is one of the most requested renovations in Omaha's older neighborhoods, from Dundee bungalows to Millard split-levels. It transforms how a family uses the main floor. But it is also one of the most misunderstood projects in terms of cost and complexity.
Which Walls Are Load-Bearing?
Not every interior wall can come down. Load-bearing walls support the weight of the floor or roof above them. In most Omaha homes, load-bearing walls run perpendicular to the floor joists and are positioned near the center of the house. You can get a preliminary idea by checking the basement: if there is a beam or post directly below a wall, that wall is likely load-bearing. However, never make this determination yourself. A structural engineer ($300-$500 for a residential assessment) provides the definitive answer.
Structural Beam Requirements
When a load-bearing wall is removed, its job transfers to a structural beam, typically an LVL (laminated veneer lumber) beam or a steel I-beam. The beam size depends on the span and the load above. For a typical 12-16 foot opening in an Omaha ranch or two-story, expect an LVL beam ($800-$2,000 for the beam itself) supported by posts that transfer the load down to the foundation.
Permit Requirements in Omaha
Any structural modification in the City of Omaha or Douglas County requires a building permit. You will need stamped engineering drawings showing the beam size, post locations, and connection details. The permit process takes 1-3 weeks and costs $100-$250 depending on project value. Do not skip this step. Unpermitted structural work creates legal and insurance liabilities that can kill a future home sale.
Cost Range and Impact
A complete wall removal with structural beam installation in Omaha runs $5,000-$20,000 depending on wall length, load above, and finish work required. The lower end covers a simple non-bearing wall removal with drywall patching. The upper end includes a steel beam, post footings, electrical rerouting, HVAC duct relocation, and seamless flooring and ceiling repair. The before-and-after impact is dramatic: a cramped, segmented main floor becomes a single open living space that feels twice as large.
Multi-Room Renovation Timeline
Here are two realistic scenarios for Omaha homeowners planning a phased interior remodel:
6-Month Plan
$40,000 - $70,000
Kitchen + 1 Bathroom
- • Month 1: Design, material selection, permits
- • Month 2: Infrastructure upgrades (electrical, plumbing rough-in)
- • Months 3-4: Kitchen demolition, construction, and installation
- • Month 5: Primary bathroom renovation
- • Month 6: Punch list, flooring transitions, final inspections
12-Month Plan
$80,000 - $150,000
Kitchen + 2 Bathrooms + Living Area + Basement
- • Months 1-2: Design, engineering, permits, infrastructure
- • Months 3-4: Kitchen remodel + open-concept conversion
- • Months 5-6: Primary and secondary bathroom renovations
- • Months 7-8: Living area finishes (flooring, paint, trim, lighting)
- • Months 9-10: Basement finish-out
- • Months 11-12: Bedrooms, punch list, final inspections
Working with One Contractor vs. Multiple Specialists
When renovating multiple rooms, homeowners face a fundamental decision: hire a general contractor to manage the entire project, or act as your own general contractor and hire specialists individually.
Self-Managing Multiple Specialists
- Potential savings: You eliminate the general contractor's overhead markup (typically 15-25%), which can mean $10K-$30K in savings on a large project
- Scheduling burden: You are responsible for coordinating plumbers, electricians, drywall crews, painters, flooring installers, and tile setters. One delayed trade cascades into every trade behind it
- Liability gaps: If the plumber's rough-in does not align with the cabinet installer's specs, who is responsible? When you self-manage, you are
- Permit responsibility: You pull the permits, schedule the inspections, and resolve any code violations
Hiring a General Contractor
- Single point of accountability: One contract, one schedule, one phone call when something goes wrong. A general contractor like LongView Renovation coordinates all trades, manages the timeline, and takes responsibility for the finished result
- Trade relationships: Established GCs have vetted subcontractor relationships built over years. They get priority scheduling, negotiated material pricing, and reliable quality from crews they have worked with on dozens of projects
- Problem resolution: When the unexpected happens (and it always does), a GC resolves it without involving you in every decision. Hidden water damage, code surprises, and material substitutions get handled by someone who deals with these issues every week
- Warranty coverage: A reputable GC warrants the entire project, including subcontractor work. You have one entity to call if anything needs attention after completion
For multi-room renovations exceeding $40K, the coordination complexity almost always justifies hiring a general contractor. The markup pays for itself in avoided scheduling delays, rework, and stress.
LongView Pro Tip
Before starting any multi-room renovation, schedule a full-house walkthrough with your contractor. A thorough pre-construction inspection identifies hidden issues that can blow up your budget if discovered mid-project. Knob-and-tube wiring hiding behind plaster walls, cast-iron drain stacks that are corroded and near failure, asbestos tile beneath carpet or vinyl, and inadequate insulation in exterior walls are all common discoveries in Omaha homes built before 1980. Finding these issues during the planning phase allows you to budget for them. Finding them during demolition turns a planned $50K project into an unplanned $65K project.
Ready to Prioritize Your Interior Remodel?
Free Home Assessment & Prioritized Plan
Stop guessing which room to renovate first. Our team walks through your entire home, evaluates every space, and delivers a prioritized renovation plan with room-by-room cost estimates tailored to your budget and goals.
Free Home Assessment
We evaluate every room in person
Prioritized Plan
Strategic room-by-room roadmap
Room-by-Room Quote
Transparent cost breakdown per space
Strategy Beats Impulse Every Time
Renovating your entire home is not a single decision. It is a series of decisions made in the right order. The homeowners who end up happiest with their renovations are not the ones who spent the most money. They are the ones who spent their money in the right sequence, avoided rework, consolidated trades, and trusted the process even when it felt slow.
Start with the infrastructure. Tackle the kitchen while your tolerance for disruption is highest. Roll into bathrooms while the plumbing crew is already mobilized. Finish living areas and bedrooms when the hardest work is behind you. Each phase builds on the last, and by the time you reach the final punch list, you will have a home that feels entirely new without a single wasted dollar.
Your home did not get outdated overnight, and it does not need to be transformed overnight. A well-sequenced plan executed over six to twelve months delivers better results than a rushed renovation that tries to do everything at once. Trust the sequence. Trust the process. And trust the team you hire to execute it.